
On this page, you will find step-by-step guides to ordering, sending and managing visitor invitations and tickets.
Order vouchers
In this section, you can order additional visitor vouchers.
Step-by-step guide
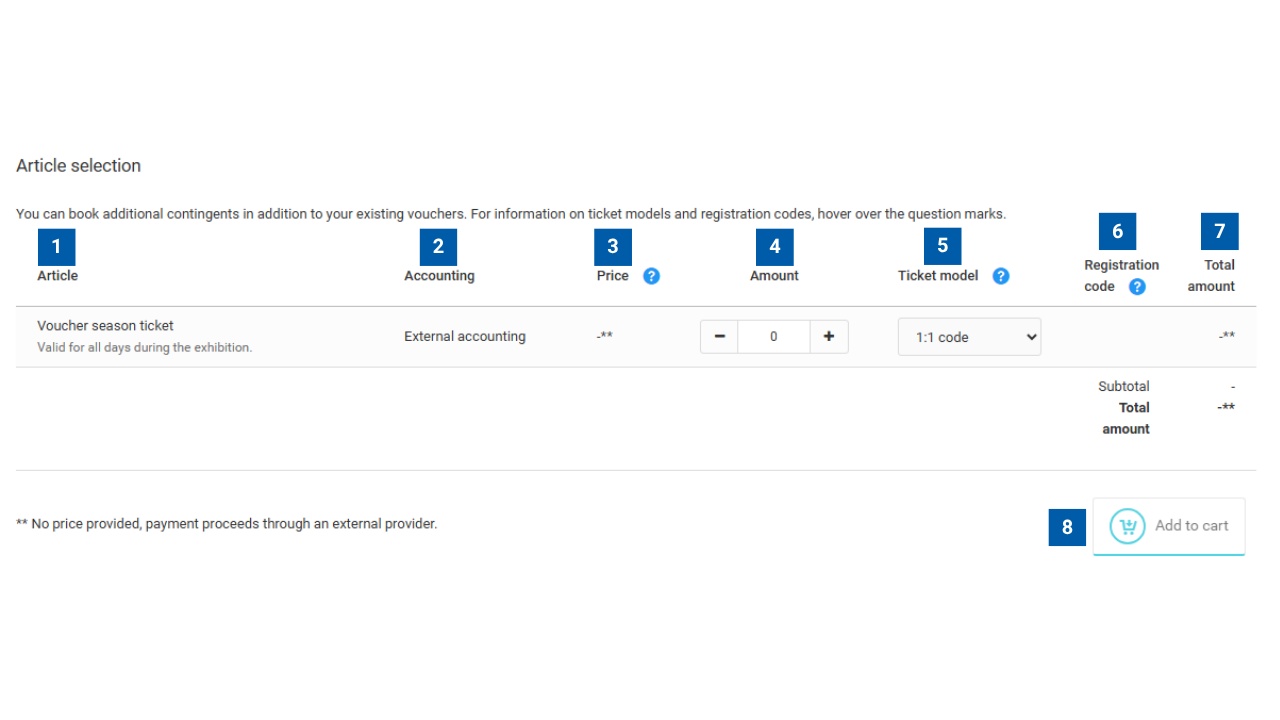
1 – Article
The selected item is displayed here. The Full-Event Ticket Voucher is valid on all days of the event.
2 – Accounting
Accounting is handled externally.
3 – Price
No prices are displayed, as payment is processed via an external interface.
4 – Amount
Use the plus and minus buttons to select the required number of vouchers.
5 – Ticket model
For this item, the “1:1 Code” ticket model is available. Each exhibitor pass contains an individual registration code that can be redeemed for exactly one exhibitor pass.
6 – Registration code
With the “1:1 Code” ticket model, you do not need to specify your own registration code. Therefore, no information is displayed in this field.
7 – Total amount
No total amount is displayed, as payment is processed via an external interface.
8 – Add to cart
Click “Add to cart” to add the selected vouchers to your basket.
Invite visitors
In this section, you can invite customers and business partners to visit your exhibition stand. Select the appropriate invitation type and send visitor vouchers or provide registration codes.
Step 1: Invite visitors
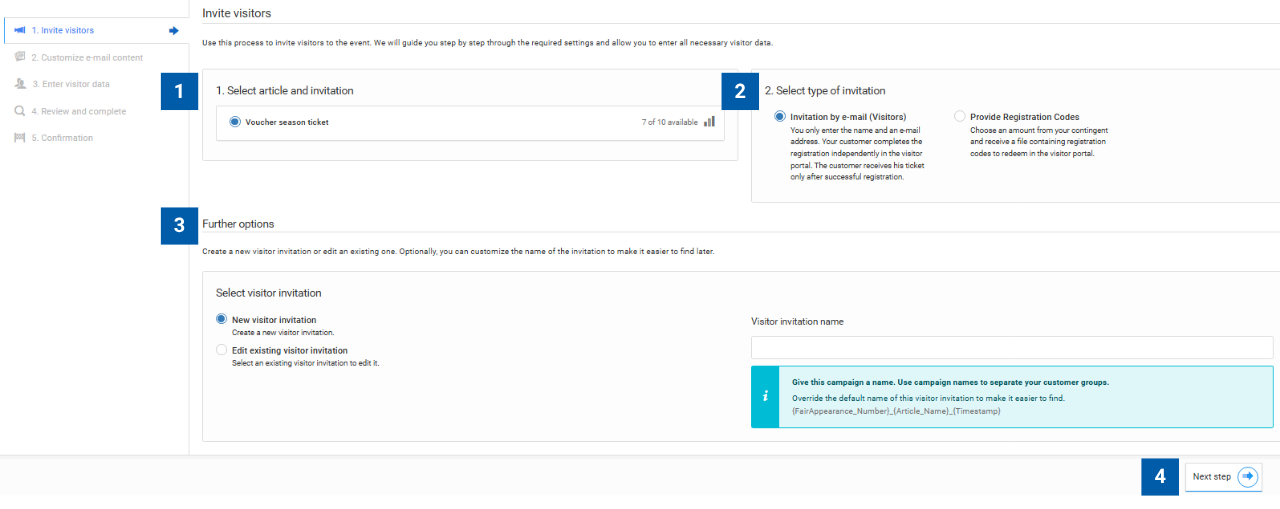
1.1 Select article and invitation
Select the item you would like to use to invite your visitors. For visitor vouchers, the Voucher season ticket is available.
On the right, you can see the number of vouchers still available. This number corresponds to your previously ordered voucher allocation and decreases with each invitation used.
1.2 Select invitation type
Choose how you would like to invite your visitors:
- Invitation by email (visitor): Enter the visitor’s name and email address. The visitor will then receive an email, register themselves in the visitor portal and receive their ticket once registration has been successfully completed.
- Provide registration codes: Select the required number of registration codes from your voucher allocation. You will then receive a file containing the registration codes, which you can pass on to your visitors.
1.3 Select further options
Choose whether you would like to create a new visitor invitation or edit an existing visitor invitation.
- Create a new visitor invitation: Enter a name for the visitor invitation. A clear name will make it easier to find later. If you leave the field blank, the system will automatically generate a campaign name.
- Edit an existing visitor invitation: Use the drop-down menu to select the visitor invitation you would like to edit based on the name you assigned to it.
1.4 Proceed to the next step
Click “Next step” to continue.
- If you selected “Invitation by email (visitor)” under 1.2, the next step will take you to customise the email content.
- If you selected “Provide registration codes”, the email customisation step will be skipped and you will proceed directly to Step 3 “Amount”.
Note: Step 3 varies depending on the option selected under 1.2. If you selected “Invitation by email (visitor)”, Step 3 is called “Enter visitor details”.
Step 2: Customise email content
(if the “Invitation by email” option was selected in Step 1.2)
Note:
This step is only displayed if you selected “Invitation by email (visitor)” in Step 1.2. If you selected “Provide registration codes”, this step will be skipped.
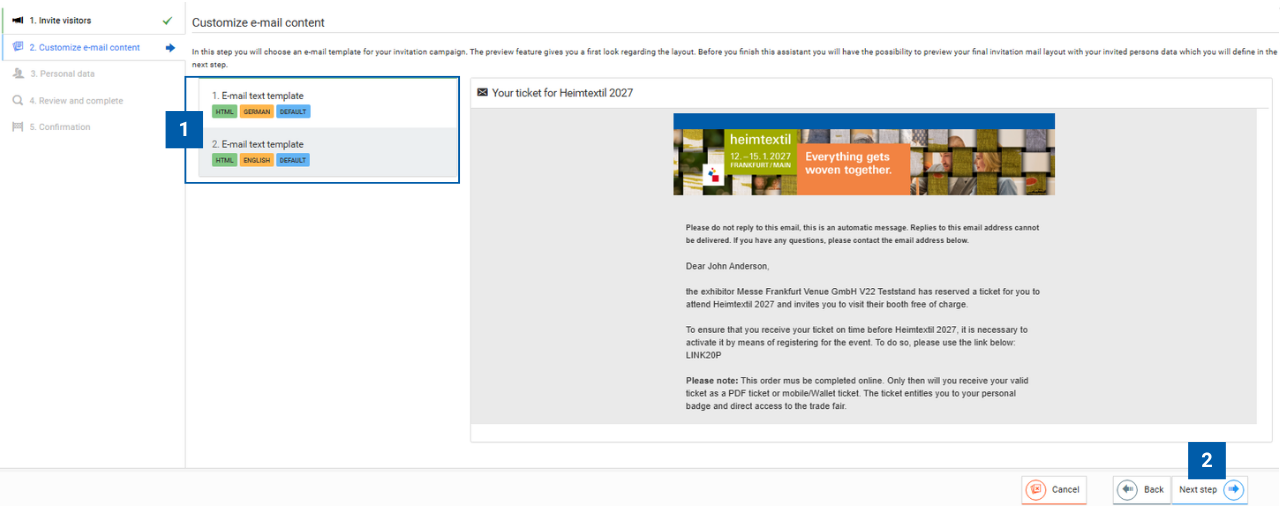
2.1 Select email template
Select the appropriate email template for your visitor invitation. Depending on your target audience, you can choose between a German-language and an English-language template. A preview of the selected email is displayed on the right.
2.2 Proceed to the next step
Click “Next step” to continue entering the visitor details.
Note:
You can use “Back” at any time to return to the previous step and amend your entries. Click “Cancel” to end the invitation process.
Step 3: Enter personal data (if the “Invitation by email” option was selected in Step 1.2)
Note:
This step is only displayed if you selected “Invitation by email (visitor)” in Step 1.2. If you selected “Provide registration codes”, the “Amount” step will be displayed instead.
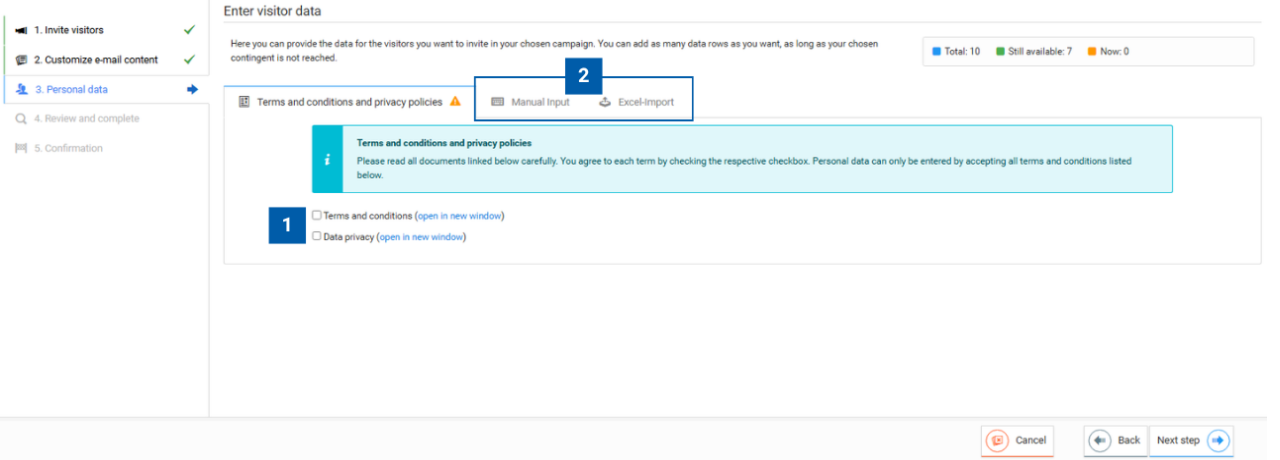
3.1 Confirm terms and conditions and privacy policy
Read the Terms and Conditions and the Privacy Policy and confirm your acceptance by ticking the respective checkboxes. Visitor details can only be entered once you have done so.
3.2 Enter visitor data
There are two ways to enter visitor details:
Manual input: Enter the visitor details directly in the system. Mandatory fields are marked with an *. You can also add optional information such as the company name or address. Use the “Allow duplicates” option to specify whether identical records may be entered.
Excel import: If you would like to invite several visitors at the same time, you can import their details using Excel. First download the Excel template, enter the visitor details and then upload the completed file back into the system.
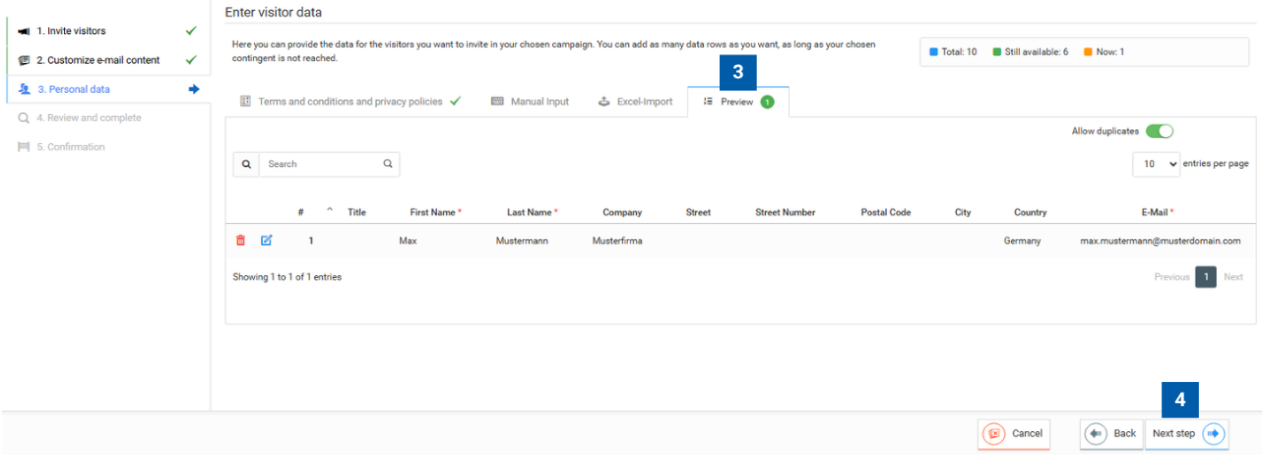
3.3 Review and, if necessary, edit visitor details
After manual entry or the Excel import, the visitor details you have entered are displayed in the “Preview” tab. Here you can review all records before sending the invitations. Use the search function to quickly find individual visitors. You can also edit or delete records that have already been entered.
3.4 Proceed to the next step
Click “Next step” to review all your entries.
Step 3: Amount
(if the “Provide registration codes” option was selected in Step 1.2)
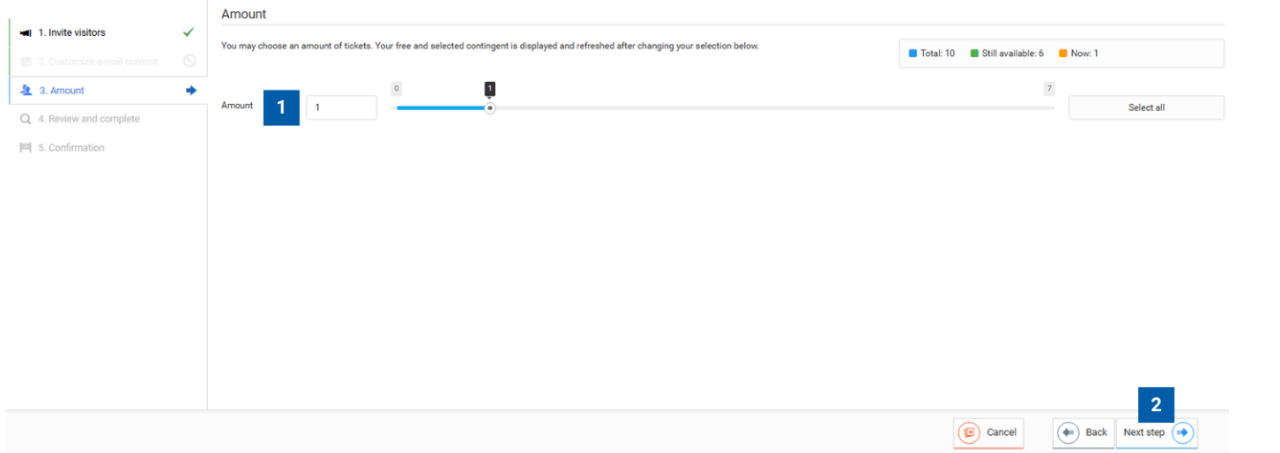
3.1 Specify the number of registration codes
Specify the required number of registration codes. You can either enter the number directly in the input field or select it using the slider. Click “Select all” to use all registration codes that are still available.
Note:
The current status of your voucher allocation is displayed in the top right:
- Total: Total number of registration codes available.
- Still available: Number of registration codes not yet used.
- Now: Number of registration codes you have currently selected.
3.2 Proceed to the next step
Click “Next step” to review all your entries.
Step 4: Review and complete
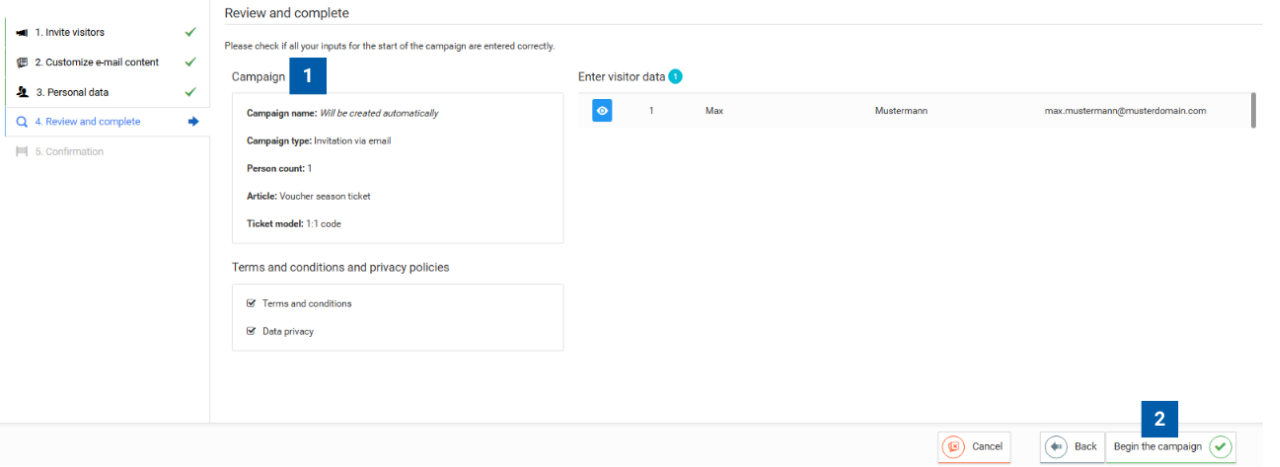
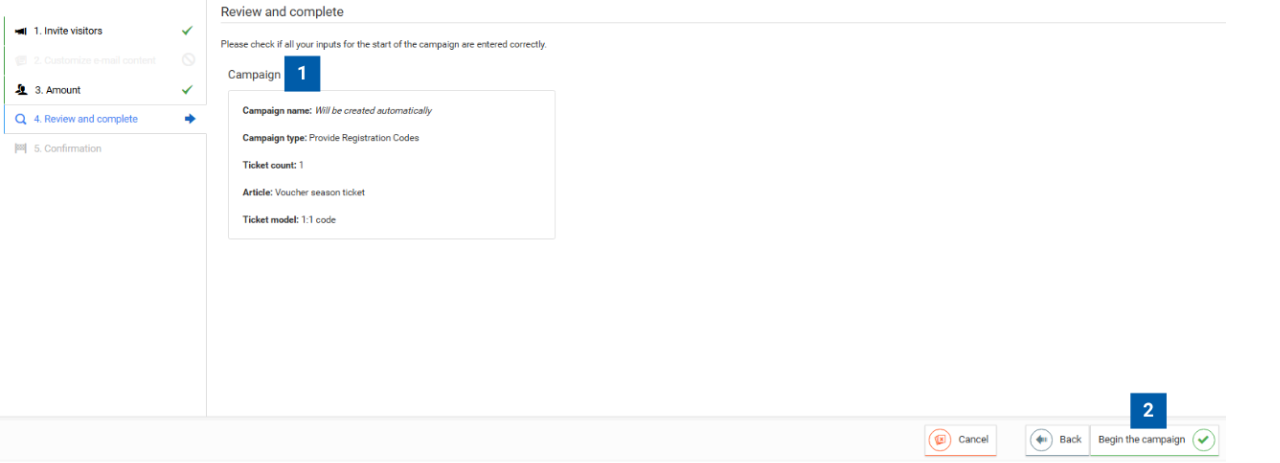
4.1 Review your entries
Review all the details of your visitor invitation once again.
The information displayed will vary depending on the invitation type selected:
- Invitation by email: Review the campaign details, the accepted Terms and Conditions and Privacy Policy, as well as the visitor details entered.
- Provide registration codes: Review the campaign details and the selected number of registration codes.
If you need to make any changes, you can click “Back” at any time to return to the relevant step and amend your entries.
4.2 Begin the campaign
If all details are correct, click “Begin the campaign” to complete the invitation process.
Manage visitor tickets
In this section, you can view an overview of your visitor invitations and your most recent activities. Use the search function to quickly find and manage visitor invitations based on various search criteria.

1. Search for visitor invitations
Use the search fields to filter visitor invitations according to specific criteria. You can search using criteria including:
- General search
- Campaign name
- Country
- Company
- Last name
- Sub-account
Then click “Search” to display the relevant results. Click “Reset” to clear all search criteria.
2. View search results
All visitor invitations are displayed in an overview below the search function. This includes information such as the ticket status, visitor details, item name, barcode, registration code and campaign name.
3. Perform actions
Depending on the status of the visitor invitation, various functions are available in the “Actions” column.
Invitation sent, visitor not yet registered:
You can:
- view the visitor details,
- resend the invitation by email.
Visitor already registered:
Once registration has been completed successfully, the visitor voucher is converted into a ticket. You can then:
- view the visitor details,
- download the ticket as a PDF,
- display the mobile ticket for Apple Wallet,
- display the mobile ticket for Google Wallet,
- resend the invitation by email.
Note:
The available actions depend on the current status of the visitor invitation.
View voucher allocations
In this section, you can view an overview of your ordered voucher allocations. At any time, you can see how many vouchers are available, have already been allocated or have been redeemed.

1. Overview of voucher allocations
The table displays all ordered voucher allocations together with the key information, including:
- Order position – Unique order number.
- Sub-account – Shows the assigned sub-account, if applicable.
- Article – Name of the voucher item ordered.
- Created – Date and time of the order.
- Ticket model – Ticket model used for the voucher.
- Registration code – Shows the type of registration code used.
- Status – Current status of the voucher allocation.
2. View allocation status
The table also shows the current status of your voucher allocation:
- Amount – Total number of vouchers ordered.
- Assigned – Number of vouchers that have already been assigned to visitors.
- Entered – Number of visitors who have redeemed their voucher and been admitted to the event.
Note:
The displayed quantity may also include cancelled tickets.